Carolina Gold Rice Bread
introduction
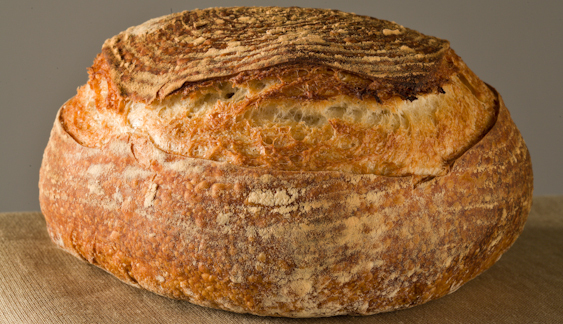
Long a staple of the Southern kitchen when wheat was costly and rice abundant—but today virtually extinct—rice bread has a close, moist crumb and a blistering crust. Historically, rice bread recipes contained just 20 to 25 percent rice or rice flour. That’s because, mechanically speaking, rice needs a fair amount of wheat to produce a respectable loaf.
We made rice breads with cooked rice, rice flour, and rice flour paste. Cooked rice made a spotty contribution; rice flour was too granular; rice paste, just right! Multiple trials later, we offer this fine country-style rustic rice bread recipe that uses a starter or poolish of wheat flour to build a basic dough, and the addition of rice flour paste. The bread has a crackling crust, a pleasing nuttiness on the palate, and a fine, moist golden crumb.
In the 1800s Carolina and Georgia cooks prepared rice for the table every day. They baked bread with rice every day as well. Rice flour or leftover cooked rice replaced a portion of wheat flour in many bread recipes of the time. Wide ranging in its iterations—from sweet, enriched quick breads to rustic free-form loaves—rice bread was so pervasive prior to the Civil War that it’s said there were as many recipes for rice bread as there were cooks in the South. Today, though hundreds of distinct recipes remain alive in the public archives, the bread itself has disappeared. No one is sure why.
Baking Notes
We list ingredient quantities in both weight and volume, but weights are important in baking, so if you have a scale, please use it. Regular unbleached all-purpose flour is called for in this recipe. Bread flour is too muscular and will not produce favorable results. This recipe uses a small amount of yeast and overnight fermentation to encourage full flavor development in the dough. The dough is mixed and risen one day, refrigerated overnight, and baked the next morning.
The biggest impediment to producing a decent loaf of bread at home is the heat loss conventional ovens sustain during baking. High humidity during the early phase of baking is critical as well. This recipe creates a cloche effect by using a large pizza stone and a clean terra cotta pot for a lid—a pot about 12 inches in diameter at the top and 10 inches at its greatest depth is suitable. To be effective, both must be preheated in a 500-degree oven for an hour.
To bake the bread, transfer the pot briefly from the stone to the open oven door, slide the dough onto the stone, and lower the pot over the dough to bake. If baked without a cloche, this bread will have a tough crust and compromised height.
equipment mise en place
For this recipe, you will need a digital kitchen scale; a stand mixer with a dough hook attachment; a wooden spoon; a rubber spatula; a small saucepan; a 10-inch round of parchment paper; a rimless baking sheet, an inverted rimmed baking sheet, or a flat plate; a large baking stone; a terra cotta pot (see Baking Notes); a small, sharp knife or razor blade; long oven mitts; an instant-read thermometer; and a wire cooling rack. A coiled brotform or proofing basket is optional.
-
for the poolish:
-
5ounces (1 cup) unbleached all-purpose flour
-
½teaspoon instant yeast
-
5ounces (½ cup plus 2 tablespoons) warm spring or filtered water
-
-
for the rice slurry:
-
0.7ounces (3 tablespoons) Anson Mills Carolina Gold Rice Flour
-
4ounces (½ cup) spring or filtered water
-
-
for the dough:
-
½teaspoon instant yeast
-
3ounces (scant ½ cup) warm spring or filtered water
-
15ounces (3 cups) unbleached all-purpose flour
-
1½teaspoons fine sea salt
-
-
Make the poolish: Combine the flour, yeast, and water in the bowl of a stand mixer and stir vigorously with a wooden spoon until the mixture is shiny and well mixed and has the consistency of a smooth, heavy batter, about 40 strokes. Scrape down the sides of the bowl with a rubber spatula, cover tightly with plastic wrap, and let rise at room temperature until the poolish has doubled in volume and is bubbly and fragrant, 4 to 5 hours, depending on the ambient temperature.
-
Make the rice slurry: Stir the rice flour and water together in a small saucepan and bring to a simmer over low heat, stirring constantly. Simmer until thick, glossy, and smooth, about 10 seconds. Remove from the heat, scrape onto a plate with a rubber spatula, and let cool.
-
Make the dough: Place the bowl with the poolish on a stand mixer fitted with the dough hook attachment. Add the yeast and water and stir on low speed to combine. Stir in 2 cups of flour and the salt. Knead on low speed until a smooth, strong, elastic dough forms, about 20 minutes. Add the rice slurry and the remaining flour and knead until smooth and silky, about 5 minutes. Remove the bowl from the mixer and cover tightly with plastic wrap. Let rise at room temperature until the dough has doubled in size, about 3 hours.
-
Turn the dough onto an unfloured work surface and shape it into a rough ball. Cup both hands around the dough and drag its bottom against the counter, using friction to stretch and tighten the dough into a smooth ball. Place the dough on a 10-inch round of parchment paper and slide it onto a rimless baking sheet, inverted rimmed baking sheet, or flat plate. Cover with plastic wrap and refrigerate for 30 minutes to 1 hour. (The dough will continue to rise over this period but will become cooler and hold its shape.)
-
Remove the dough from the refrigerator and reshape it in the same way. When the dough is properly shaped, it will form a compact ball about
6 inches in diameter and about 3½ inches high, with a taut surface. Return the dough to the parchment round and slip it onto the rimless baking sheet or flat plate. Alternatively, place the dough seam side-up in a floured brotform or proofing basket. Cover with plastic wrap and refrigerate overnight. -
Bake the bread: Adjust one oven rack to the lowest position; remove the second rack. Place a large baking stone on the oven rack and set a clean terra cotta pot about 12 inches in diameter and 10 inches deep on the baking stone. Heat the oven to 500 degrees for 1 hour. As soon as you have turned on the oven, remove the proofed dough from the refrigerator, lift off the plastic wrap, and re-drape it loosely over the dough. Let the dough stand at room temperature while the stone heats. Remove the plastic wrap altogether about 10 minutes before baking. When the dough is ready to bake, slash four stripes ¼ inch deep and about 3 inches long into the dough around its top with a small, sharp knife or razor blade. Wearing long oven mitts, quickly pull out the oven rack halfway and transfer the pot from the baking stone to the open oven door. Slide the dough—and its parchment—from the baking sheet or plate onto the stone and immediately invert the pot over the dough. (If you have proofed the dough in a basket, just before baking, invert it onto a parchment-lined inverted sheet pan or a pizza peel and score the bread. Slip it onto the stone as directed.) Reduce the oven temperature to 450 degrees and bake for 25 minutes. Lift off the pot from the bread and continue to bake until an instant-read thermometer inserted into the center of the loaf registers 190 to 200 degrees, about 5 minutes more. The bread should be nicely risen and deep golden brown. Remove the bread from the oven and let cool completely on a wire rack.