Graham Pâte Sucrée

introduction
Who doesn’t love a graham cracker crust? It scores 10 points for its vaguely low-rent crunchy, granular appeal. Even the odd bad one is pretty good. Except when it’s not. We don’t mind a sandy semi-dissolving graham crust—underbuttered, underpressed, or underbaked. Harmless. It’s the thick lacquered crust to watch out for. One minute you can’t get a fork through it, the next minute a slab of wreckage has skittered across the table and crashed to the floor.
When we decided to go graham, we went graham with crackers made from Anson Mills flour, of course. The resulting crust was pretty terrific, principally because our graham flour is 100 percent whole grain with fat, crunchy flecks of bran straight out of the 19th century. Still, it seemed silly to perform double baking duty when we had, at our fingertips, a singularly fabulous graham flour. Why not a proper crust, one to roll out and crimp?
And this is where we ended up: with a short, buttery, graham pastry dough that rolls out, crimps, and tastes better than any ground up graham cracker crust on Earth!
Baking Notes
Basically a graham cookie dough, this dough is super low maintenance, requiring no real chilling or rest before rolling out. It patches easily, too.
equipment mise en place
To make the dough, you will need a digital kitchen scale, a food processor, parchment paper, plastic wrap, a rolling pin, a standard 9-inch pie pan, aluminum foil, about a quart of pie weights or dried beans, a baking sheet, and a wire cooling rack.
-
-
4.5
-
2.5ounces Anson Mills Colonial Style Fine Cloth-Bolted Pastry Flour, plus additional for dusting
-
0.7ounces (1 tablespoon) dark brown sugar
-
¼teaspoon baking soda
-
⅛teaspoon fine sea salt
-
0.5ounces (1 tablespoon) honey
-
3.6ounces cold unsalted European-style butter, cut into small pieces
-
-
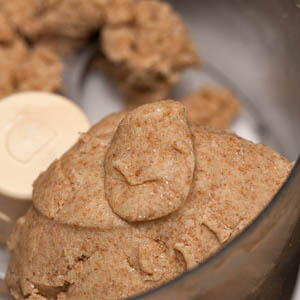
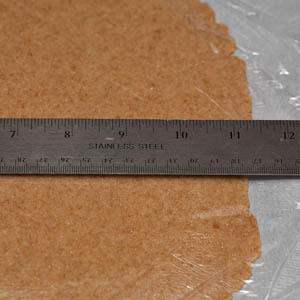
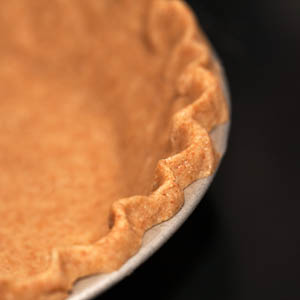
Place the flours, sugar, baking soda, and salt in a food processor and process until the mixture is well combined and no brown sugar lumps remain, 15 to 20 seconds. Drizzle the honey and scatter butter pieces over the surface and pulse to a coarse meal, about fifteen 1-second pulses. Let the processor run until a dough forms, chases itself around the bowl, and comes together in a cohesive mass (fig. 1.1), 20 to 30 seconds. Lay an 18-inch length of parchment paper on the counter. Dump the dough onto the paper and press it together firmly and into a disk. Drape an 18-inch length of plastic wrap over the dough and roll out the dough to an 11-inch round (fig. 1.2); the dough will be about ⅜ inch thick. If you like, refrigerate the dough in its sheath for 5 to 10 minutes (but no longer or the dough will crack getting into the pan) or line the pie pan immediately. Peel off the plastic sheet and sprinkle the dough lightly with flour. Replace the plastic lightly over the dough. Using the edges of the parchment, flip the dough. Lift off the parchment and lightly sprinkle the second side of the dough with flour. Lightly roll up the dough around the rolling pin (fig. 1.3), and then unroll it into a standard 9-inch pie pan, fitting it into the corners. Crimp the edges (fig. 1.4). (The dough will patch easily should any mishaps arise.) Refrigerate for at least 30 minutes or up to 2 hours.
-
Adjust the oven racks to the upper- and lower-middle positions and set a baking sheet on the upper rack. Heat the oven to 375 degrees.
-
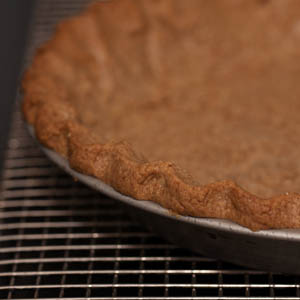
Line the chilled dough-lined pie pan with a sheet of aluminum foil, allowing ample overhang. Pour a quart of pie weights or dried beans into the aluminum foil to come almost flush with the top of the crust. Set the pie pan on the baking sheet and bake without peeking for 30 minutes, rotating the baking sheet halfway through. Remove the baking sheet from the oven and reduce the oven temperature to 300 degrees. Carefully lift out the foil and pie weights, and then set the baking sheet on the lower oven rack. Continue to bake until the pie crust is browned, dry, and crisp, about 10 minutes more. Remove from the oven, set on a wire cooling rack (fig. 3.1), and let cool completely.
-
-
1.1
-
1.2
-
1.3

-
1.4
-
-
-
3.1
-