Mak Kimchi

introduction
So far into the fermentation frenzy has kimchi been swept it sometimes forgets where it came from. It came from Korea, of course, and though this miraculous condiment has been appropriated of late by health fanatics, fermentation freaks, paleoists, and GAPS proponents, Koreans remain quietly steadfast to their ancient foodway, and consume it, by all accounts, every day.
For those of you who have yet to succumb to its charms, kimchi is a naturally fermented slaw of sorts, brimming with vitamins and probiotics—and rocketing with flavor. Quenching, tart, crisp, naturally effervescent, and frequently fiery, kimchi is made through a process that uses salt to draw fermentable sugars and natural microorganisms from raw vegetables, stimulating the growth of lactic acid bacteria—the bacteria voted most likely to succeed in creating appealing fermentation flavors, be they in bread, beer, or pickles. Lactic acid bacteria converts carbohydrates to lactic acid, crucial to the fermentation process because it hardens pectins in their flesh (giving them crunch) and inhibits bad bacteria from growing (and making us sick). In classic cabbage kimchi like this one, those vegetables are typically, but by no means exclusively, napa (a type of Chinese cabbage) and daikon, and once salted or brined, they are bathed in a spirited seasoning blend of Korean hot pepper; garlic; salted shrimp, fresh squid or oysters; fish sauce; and other special flavor effects—bound together in a creamy, smooth rice flour porridge and showered with chopped scallions. The rice part is where Anson Mills comes in. The rice-thickened seasoning paste coats the vegetables and brushes them with a touch of gloss. If the proportions are correct and everybody in the jar is behaving, the rice flour also ultimately lends an appealing sauciness to the liquid released during fermentation.
The kimchi remains captive in its vessel for 4 to 5 days at room temperature while the exciting conversions we describe above take place and it begins to bubble actively, becomes tart, tangy, and spritzy, and its flavors grow round and compelling. Pretty straightforward.
Yet we were terrified to make kimchi. It seemed too mysterious, too bound with a tradition of which we had little understanding, too complicated to get right. Salt and water ratios, temperature, additional ingredient proportions, fermentation time—we spent a couple of weeks just contemplating the right vessel. But kimchi had become something of an obsession for us.
In addition to the Korean dishes where it figures directly, kimchi has any number of unexpected, easy applications. It transforms a sliced avocado. Sliced avocado and cold poached chicken—yes, please. Kimchi can mesmerize a skillet of greens or zap a bowl of white rice with thrumming flavor. It makes scrambled eggs wake up in the morning. A topping for grilled fish—you go, kimchi! Chop it up, put it in a homemade mayo, and eat it with crudo. And on and on. So captivated have we become by its tart, swirling umami flavors, we chopstick kimchi out of the jar and fall in love all over again.
If your live in a place with only a small Korean population, your choices narrow substantially. With respect to most commercial kimchi, it is impossible to know what stage of fermentation you’re getting in that jar—beginning, middle, or end. Often jarred without the benefit of its fermentation liquid, kimchi can be either not quite there or a little too been-there-and-gone to be great. (When kimchi advances beyond a certain point in its ferment, the crispness of the vegetables diminishes and the flavors grow more assertive—perhaps too assertive.)
We began this recipe as if planning a long trip in uncertain weather. It turned out much better than expected.
Cooking Remarks
We chose a brine rather than a dry-salt cure for our napa because the cabbage is chopped—hence the name mak, which means “careless”—and was eager to weep. (Traditional recipes, for poggi kimchi, cure the cabbage in halves or quarters—first with salt, then by spreading seasoning paste between the leaves. That’s one for another day.) The cabbage rested overnight refrigerated in the brine and emerged next morning from the liquid perfectly seasoned and delightfully crisp. But daikon, the Asian radish whose distinctive piquancy makes it favored for kimchi, is another story. The Japanese variety, which is, in all probability, what you’ll be buying, are, in particular, bursting with liquid. (Korean daikon are shorter and stouter with green shoulders. They’re also quite difficult to find unless you live in the vicinity of a Korean grocer.) Many mak kimchi recipes julienne the daikon to help it keep pace with the cabbage in the brine. We didn’t like how the misbegotten cuts worked together so we went to quarter-rounds of daikon. We then salt-cured it before adding it to the drained brined cabbage. This circumvented a torrent of moisture running into the seasoned kimchi and diluting the seasoning.
Natural fermentation requires organic produce and pure sea salt. The napa should look frilly and pale green—and feel firm. The daikon must not be flaccid. We used fresh uncured garlic from the farmers’ market in one of our batches and it was sweet and mellow. Very nice. If you have regular supermarket garlic (which is cured) and if the cloves contain green germs or sprouts, make sure to remove them before mincing, as the germs taste bitter and hot.
Many recipes suggest kicking off fermentation with a touch of sugar. But since we’re trying to kick sugar, we chose grated green apple instead. We found coarse organic gochugaru, dried Korean red pepper that broadcasts the aroma, flavor, and heat we associate with kimchi, and a good-quality fish sauce (Red Boat brand, though we understand that Three Crabs is the brand of choice for many Korean cooks). All of these items are available from Amazon. If you’re lucky and live in Honolulu, Los Angeles, New York, or Bergen County, New Jersey, you’ll have no problem tracking down Korean salted shrimp called saeujeot. This funky, briny umami-ful ingredient is packed in glass or plastic jars and sold in the refrigerator section of Korean markets. Many of you, however, will be able to track down fresh oysters, which, we discovered, create their own kind of magic in a kimchi bath. But there is no shame in simple fish sauce alone. In the past, kimchi was cured with chestnuts. Today, many Koreans enjoy putting chopped walnuts into the mix. We loved that addition, too.
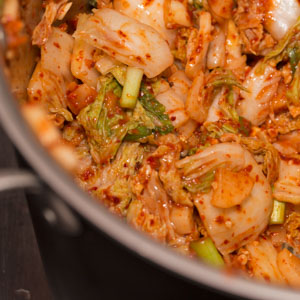
It bears noting that acidity and spiciness in kimchi are very much a matter of personal preference. Asian populations, in particular, prefer hotter, redder kimchi. A number of non-Asian friends of mine expressed “fear of kimchi” based less on its sourness than on the degree of heat—i.e., gochugaru—it frequently expresses. As evidenced by our photo, the batch of kimchi represented here is less than incendiary. It carries a pleasing dust-up of heat, but it won’t burn you. We provide a range for the gochugaru in the recipe below.
There is much discussion about fermentation times. We left some kimchi batches at room temperature for four days, others for seven. How long to ferment will depend on the temperature of your room and on your own personal preference. The most important takeaway here is that the vegetables must be submerged in the liquid throughout. Unseal the crock and taste the kimchi every day, pressing down on the vegetables with a clean spoon or tongs to pull the liquid up to cover the vegetables, if necessary. Reseal the jar and wait. It will go from a tasty raw slaw with Korean accents to something far more complex. When it’s sour enough to suit you, chill it down well and serve with abandon.
equipment mise en place
For this recipe, you will need a 3-gallon bowl, pot, or other foodsafe container; a plate for weighting the cabbage in the brine; a medium bowl; a colander and an extra-large colander; a heavy-bottomed small saucepan; a whisk; rubber gloves; a pair of tongs; a 1-gallon fermentation crock or jar with a water seal or airlock; a baking dish or pie plate; a kitchen towel to wrap the vessel if it is clear; and clean glass jars if you will be storing the kimchi in smaller portions. A digital kitchen scale would be very helpful.
-
for the vegetables:
-
5quarts filtered or spring water
-
⅔cup (6 ounces) plus 2 teaspoons fine sea salt
-
2(4- to 4½-pound) heads napa cabbage
-
1pound daikon radish
-
-
for the seasoning paste:
-
2tablespoons (0.6 ounces) Anson Mills Carolina Gold Rice Flour
-
⅔cup (5.4 ounces) spring or filtered water
-
½ to ⅔cup (2 to 2.6 ounces) Korean red pepper flakes (gochugaru)
-
2tablespoons (0.8 ounces) minced garlic
-
1Granny Smith apple, peeled, cored, and grated on the large holes of box grater (3 ounces, ½ cup)
-
3tablespoons (1.75 ounces) drained Korean salted shrimp (saeujeot), finely chopped, or 1 to 1½ dozen (depending on their size) freshly shucked oysters (about 3 ounces), coarsely chopped
-
¼cup (2 ounces) good-quality fish sauce
-
-
-
2bunches scallions
-
Anson Mills Benne Seeds, toasted, for garnish (optional)
-
-
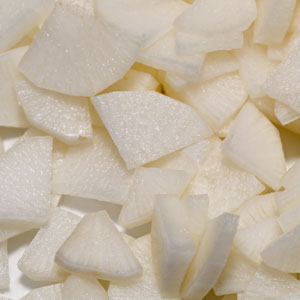
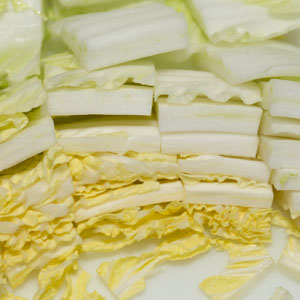
The following morning, peel and trim the daikon. Cut it in half horizontally, cut each half lengthwise into quarters, and then slice each piece into ⅛-inch-thick fan shapes (fig. 2.1). Toss the slices into a medium bowl, sprinkle with the 2 teaspoons salt, and toss well. Let stand at room temperature, tossing occasionally, until the daikon has disgorged quite a bit of liquid, about 2 hours. Meanwhile, set an extra-large colander in the sink. Pour the brined cabbage into the colander and shake the colander vigorously to drain off as much water as possible. Set the colander aside and allow the cabbage to continue to drain while you prepare the seasoning paste.
-
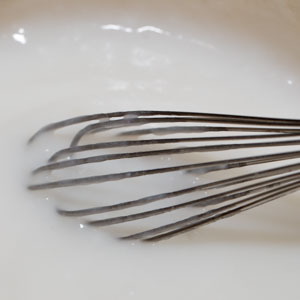
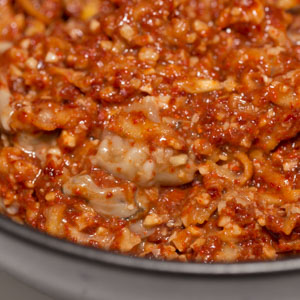
Make the seasoning paste: In a heavy-bottomed small saucepan, combine the rice flour and water and cook over medium heat until the mixture is smooth, shiny, and translucent (fig. 3.1) and small bubbles bloop about the edges, about 1 minute. Remove from the heat and let cool slightly. To the rice flour paste, add the red pepper flakes, garlic, grated apple, salted shrimp or chopped oysters, fish sauce, and walnuts. Whisk well (fig. 3.2).
-
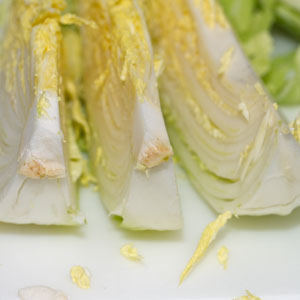
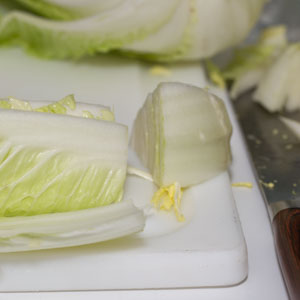
Prepare the vegetables: Pour the water into a 3-gallon bowl, pot, or other foodsafe container. Add the ⅔ cup (6 ounces) of salt and stir to dissolve. Remove and discard the wilted and damaged outer leaves from each head of cabbage. Cut each cabbage in half lengthwise, and then cut each half lengthwise into thirds (fig. 1.1). Trim and discard the base (fig. 1.2) and tip from each section, and then chop the cabbage crosswise into 2-inch pieces (fig. 1.3); you should have about 5 pounds of trimmed cabbage. Turn the cabbage into the brine, pressing down to submerge it, and weight it with a plate that fits inside the container. Refrigerate overnight.
-
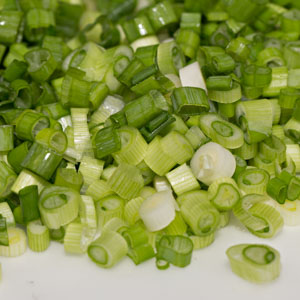
Return the drained cabbage to the 3-gallon pot or bowl (the cabbage will still be rather wet, but this is fine). Drain the daikon in the colander, rinse it well under cool running water, dry with paper towels, and add it to the cabbage. Trim and coarsely chop the scallions (fig. 4.1)—you should have about 2 cups—and toss them into the bowl. Pull on a pair of rubber gloves. Pour the seasoning paste onto the vegetables and mix well with your hands to combine (fig. 4.2), massaging the paste into the cabbage. Using clean tongs, pack the mixture into a clean 1-gallon fermentation crock or jar with a water seal or airlock; push down on the vegetables as you go to remove oxygen from their environment. Once all of the vegetables are packed in, about 2 inches of headspace should remain at the top of the vessel. Cover and seal with water or the airlock. Set the crock in a baking dish or pie plate to catch any liquid, in case overflow occurs during fermentation. If your vessel is clear glass, wrap a kitchen towel around it to shield the vegetables from direct sunlight. Allow to ferment at room temperature; once or twice a day, open the jar and use a clean spoon or spatula to press down on the kimchi to remove air pockets and to make sure that the vegetables are fully submerged in the liquid. Taste the kimchi every day or two during fermentation; when the flavors are complex and melded and the vegetables have developed a pleasing sour piquancy—after 4 or 5 days—the kimchi is ready.
-
If your fermentation vessel has a secure-fitting lid for storage, the kimchi can be refrigerated directly in the vessel. If not, use tongs to transfer the kimchi to clean glass jars. Distribute the liquid among the jars, cover tightly, and refrigerate. The flavors will continue to develop over the next days, but slowly; the kimchi will gradually turn fizzier and tangier. Expect it to keep for up to 3 months in the refrigerator. Serve very chilled, sprinkled with toasted benne seeds (if desired).
-
-
1.1
-
-
-
2.1
-
2.2
-
-
-
3.1
-
3.2
-
3.3
-
-
-
4.1
-
4.2
-