Handmade Ricotta and Basil Ravioli

introduction
Ravioli doesn’t need much of a run-up. Even the bad stuff is universally loved. (We talkin’ to you, Chef Boyardee.) The sheet pasta foundation for the ravioli is supple without being soft or wet, and a joy to handle.
Cooking Remarks
The settings on pasta machines vary to some degree. This doesn’t matter much on the broader settings, but when it gets down to the super-thin settings, things can get dicey, especially if you’re not Italian—I mean, especially if you don’t use a pasta machine regularly. Don’t worry. The penultimate setting could very well be the place you choose to stop. It’s up to you. The 2-ply edges of ravioli rolled on a slightly wider setting are still perfectly tender and delicious.
By the way, this pasta can be re-rolled for an increased yield, if you wish. Though re-rolled dough is inclined to become tough, we didn’t notice an appreciable change with a single re-roll.
American ricotta cheese is wetter than Italian. Some of it is downright weepy. We favor Organic Valley among supermarket ricottas. But you will need to drain and weight this cheese for a day or two, no matter what, in order for the filling to be firm enough in the cooked pasta.
equipment mise en place
For this recipe, you will need a large fine-mesh stainless-steel sieve; a deep bowl; a bowl that fits inside the sieve; a digital scale; a medium mixing bowl; a pasta machine; a rolling pin; a bench knife or chef’s knife; a ruler; three rimmed baking sheets; a pastry brush; a pastry bag fitted with a ½-inch plain round tip or a measuring teaspoon; two sizes of round biscuit or cookie cutters—one (plain or fluted) approximately 2½ inches in diameter, one (plain) approximately 1½ inches in diameter; a cooling rack; a large, deep braising or sauté pan to cook the ravioli; and a skimmer.
-
for the filling:
-
1pound whole-milk ricotta cheese
-
1.2ounces (⅓ cup) finely grated Parmesan Reggiano
-
1large egg white, lightly beaten
-
½garlic clove, grated
-
½ounce (about 1 cup lightly packed) basil leaves, finely chopped
-
½teaspoon freshly ground black pepper
-
Scant ½ teaspoon fine sea salt
-
-
-
1recipe Fresh Sheet Pasta
-
Anson Mills Farina di Maccheroni ‘oo’ Crema, for rolling out the dough
-
4tablespoons fine durum semolina
-
Vegetable oil spray
-
1large egg, whisked with 2 teaspoons water
-
Table salt
-
-
Make the filling: Spoon the ricotta into a large fine-mesh stainless-steel sieve set over a deep bowl. Cover the cheese flush with plastic wrap and weigh it down with a bowl that fits inside the sieve. Refrigerate for at least 1 day, or up to 2 days, to drain off excess liquid.
-
Turn the drained ricotta into a medium mixing bowl and discard the liquid that the ricotta has released (there will be between ¼ and ½ cup). Add the Parmesan, egg white, garlic, basil, pepper, and salt and stir lightly to combine. Cover flush with plastic wrap and refrigerate until ready to use.
-
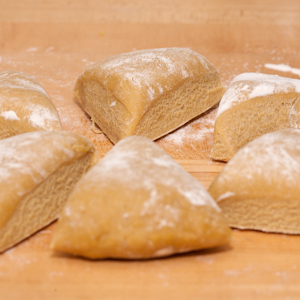
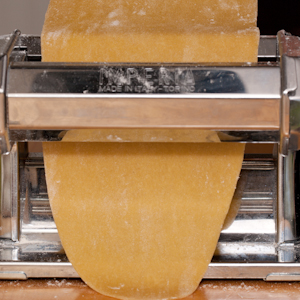
Roll out the dough: Set up the pasta machine. Cut the pasta dough into 6 pieces with a bench knife or chef’s knife (fig. 3.1) and return 5 of the pieces to the zipper-lock bag. Lightly flour the sixth piece and, using a rolling pin, roll it out on a lightly floured work surface into a band about 4 inches long, 3 inches wide, and about ⅓-inch thick. Beginning with the widest setting, run the dough once through each setting of the pasta machine (fig. 3.2), flouring as needed. When the band of dough is about 25 inches long and has been passed through the second narrowest setting (as in the larger shot, above), trim the tapered ends with a bench knife, and, if you wish, cut the dough in half to make it easier to handle. You may decide to roll the pasta through the thinnest setting, or leave it as it is. (Try it first, with just one band of dough; if the finest setting seems too tricky or perilous when you pass the pasta through the machine, or if you find the paper-thin pasta too difficult to handle, briefly re-knead the band, and then roll it out again stopping at the penultimate setting.) If you’ve chosen the second thinnest setting, pass the dough through one more time (each band will be about 15 inches long). If you’ve selected the narrowest setting, pass the bands through twice (each will be about 17 inches long).
-
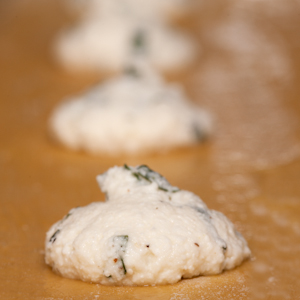
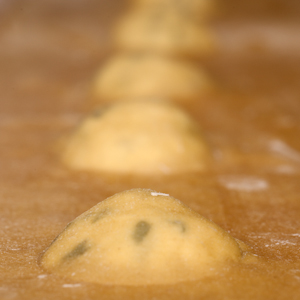
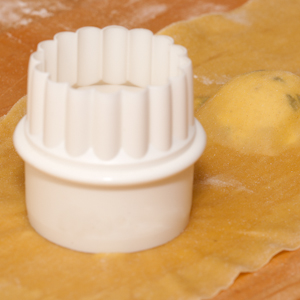
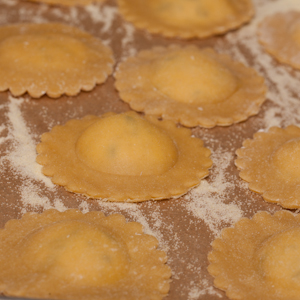
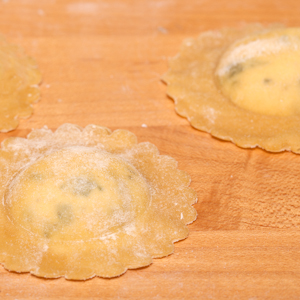
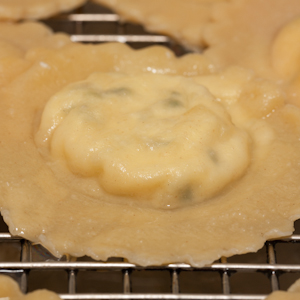
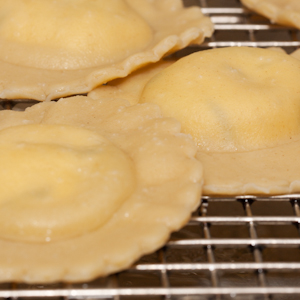
Fill the ravioli: Sprinkle each of two rimmed baking sheets with 2 tablespoons durum semolina and set them aside. Lightly flour the work surface and lay one band of dough horizontally in front of you. Without cutting through the dough, make 5 imprints at regular intervals along the dough band with a 2½-inch fluted or plain round cutter; leave a 1-inch gap between each imprint and on either end. Brush the surface of the band lightly with egg wash. Pipe or spoon a generous teaspoon of filling onto the center of each imprinted circle (fig. 4.1). Lift the second dough band, position its left edge over the left edge of the bottom layer (or opposite side if you are left-handed), and press to seal while holding the other end of the dough aloft. Working left to right (or opposite if you are left-handed), lower the top band of dough over the filling one ravioli at a time, pressing with one hand to seal the layers and push out the air. The pasta will look like this (fig. 4.2). Press a 1½-inch plain round cutter very lightly around each filling mound without cutting through the dough to further seal the pasta (fig. 4.3). Now use the larger cutter to cut through both layers of dough and stamp out the ravioli. Slightly thicker ravioli will look like this (fig. 4.4); very thin ravioli will look like this (fig. 4.5). Arrange the ravioli in a single layer on the prepared baking sheet. Repeat with the remaining pieces of dough and filling until you have used all of the filling. You will end up with 30 to 36 ravioli.
-
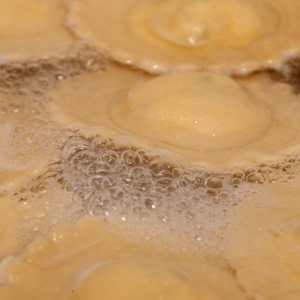
Cook the ravioli: Set a cooling rack over a rimmed baking sheet and spray it with vegetable oil spray. Fill a large, deep braising or sauté pan with water and bring the water to a boil over high heat. Add about 2 teaspoons table salt for every 2 quarts of water in the pan, and then reduce the heat so that the water simmers. Using a skimmer, gently lower 4 to 6 ravioli at a time face down into the water. Simmer until the pasta is tender but still firm, about 2 minutes, turning the ravioli once about halfway through (fig. 5.1). Using the skimmer, transfer the ravioli right side-up to the cooling rack and keep warm in a low oven. Pictured here, the thinner ravioli (fig. 5.2); pictured here, the thicker ravioli (fig. 5.3). Repeat to cook the remaining ravioli. When all the ravioli are cooked, toss them with the sauce of your choice, piping hot.
-
-
3.1
-
3.2
-
-
-
4.1
-
4.2
-
4.3
-
4.4
-
4.5
-
-
-
5.1
-
5.2
-
5.3
-