Meringue Mushrooms
introduction
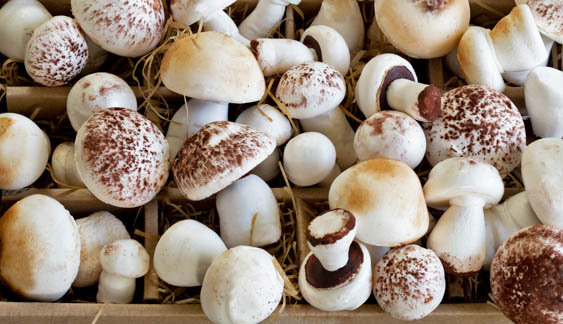
We swoon for the tender sponge roll, its silky filling and shiny dark-chocolate glaze, but our eyes linger on the fungi that dot the landscape of a bûche de noël. Crisp, with a high shatter factor and vanilla finish, meringue mushrooms belong to the school of “firm” meringues, those that require a one to one sugar-to-egg white ratio. Yes, they’re sweet, but the cake they adorn is not overly so, making these little meringues perfect bite-sized companions—not mere decorative accents spelling whimsy and wonder.
Baking Notes
A Swiss meringue, which we use for this recipe, involves heating the egg whites and all of the sugar until quite warm, then whipping them into meringue. We won’t bore you with a meringue primer, but Swiss meringue falls between the fragile French meringue and the sturdier Italian version. A Swiss meringue goes straight from double boiler to electric mixer with no intermittent fussing or guesswork like a French meringue (no, “Are the egg whites foamy now? Are they soft-peak yet? Did I sprinkle in the sugar too fast?”), and no boiling sugar syrup to contend with like an Italian. In short, a Swiss meringue performs like a Swiss army knife or any other Swiss manufactured product: it is practical, efficient, and looks good while doing it.
Meringue mushrooms don’t bake so much as simply dry to perfect crispness while remaining virginally white. It is therefore important that the oven temperature remain at 200 degrees.
You’ve heard this a hundred times, but here it is again: Any egg white preparation that involves whipping requires a sparkling-clean bowl, whisk, and mixer attachment. One drop of fat can dash an egg white’s rise and spirits. Make sure your eggs are fresh, too!
There are a few ways to affix the mushroom stems onto the caps. One borrows some of the melted chocolate that will be used to paint the caps’ undersides. Another uses a pointy chopstick or paring knife to bore a small hole in the underside of the cap into which the stem is thrust. The former is not reliably adhesive; the latter is tedious. The best solution, in our opinion, is to whip up a royal icing. Yes, royal icing demands an extra preparation, but it is quick, has stick and is, once dry, invisible. A hand-fashioned parchment piping cone offers superb delivery, but a pastry bag fitted with a coupler and a fine tip works, as well.
Use a culinary torch to make the meringues taste like toasted marshmallows and look like wild boletes.
Always tuck the mushrooms—whether assembled or not—into an airtight container, with a couple of silica sachets if you have them, for safe keeping. Silica packets rescue delicate crisp baked goods from humidity and are for sale at Amazon.
equipment mise en place
To make the mushroom caps and stems, you will need a digital kitchen scale; two rimmed baking sheets; parchment paper; two 14- to 16-inch pastry bags; a ¼-inch plain round tip and a ⅛-inch plain round tip; a medium saucepan onto which the bowl of a stand mixer will sit; a stand mixer fitted with the whisk attachment (both the bowl and attachment must be sparkling-clean); a whisk; an instant-read thermometer; a silicone spatula; a couple of clips (such as binder clips); a fine-mesh strainer; a small saucepan; a small heatproof bowl; a small, fine pastry brush; a paring knife; and a culinary torch (optional).
To make the royal icing, you will need a digital kitchen scale, a small pastry bag fitted with a tiny plain tip (or a parchment cone), and a stand mixer fitted with the whisk attachment (both the bowl and attachment must be sparkling-clean).
To store the meringues before or after assembly, you will need large, shallow airtight containers and a few silica packets (optional but recommended).
-
for the mushroom caps and stems:
-
3.5ounces egg whites
-
7ounces superfine sugar
-
Pinch of fine sea salt
-
½teaspoon vanilla extract
-
1 to 2teaspoons unsweetened Dutch-processed cocoa powder
-
0.5ounce semi-sweet or bittersweet chocolate, chopped
-
-
for the royal icing:
-
1ounce egg whites
-
2teaspoons lemon juice from 1 juicy lemon
-
5.5ounces confectioners’ sugar
-
-
Make the mushroom caps and stems: Adjust the oven racks to the upper- and lower-middle positions and heat the oven to 200 degrees. Line two rimmed baking sheets with parchment paper. Fit one 14- to 16-inch pastry bag with a ¼-inch plain tip and another with an ⅛-inch plain tip.
-
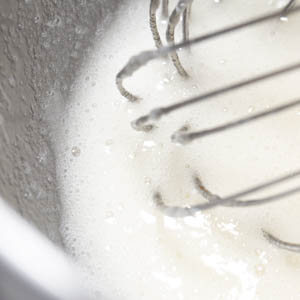
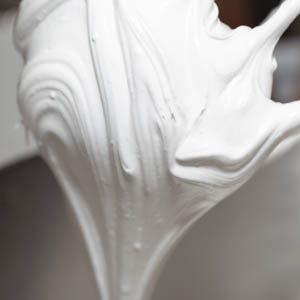
Fill a medium saucepan onto which the bowl of your stand mixer will sit with an inch or so of water; the bottom of the bowl should not touch the water. Bring the water to a simmer over medium heat. In the sparkling-clean bowl of a stand mixer, whisk the egg whites, superfine sugar, and a pinch of salt until frothy. Place the bowl on the saucepan over the simmering water and whisk constantly (fig. 2.1) until the whites register 140 degrees on an instant-read thermometer. Immediately remove the bowl from the saucepan, attach it to the mixer fitted with a sparkling-clean whisk attachment, and beat on medium-high speed until the whites are glossy, voluminous, and form stiff peaks (fig. 2.2) but are still slightly warm, about 5 minutes. Add the vanilla and beat briefly to combine.
-
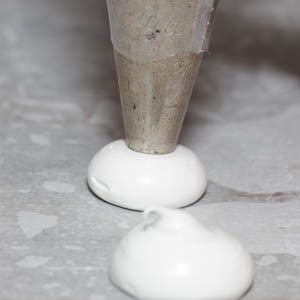
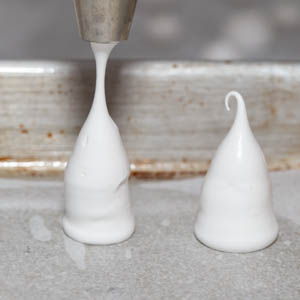
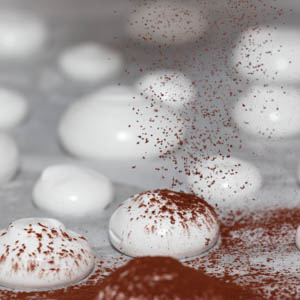
Using a silicone spatula, divide the meringue evenly between the two prepared pastry bags. Lay the bags flat and push the meringue down to the tip of each bag. Fold down the tops of the bags and clip them closed. Lift the corners of the parchment on each prepared baking sheet, dab a bit of meringue onto the corners of the baking sheet, then replace the paper. Using the bag with the larger tip, pipe mushroom caps of varying sizes (from about ½ inch to 1 inch in diameter) onto one of the baking sheets (fig. 3.1). With the smaller tip, pipe mushroom stems of varying thicknesses and heights (but no taller than 1 inch or so) onto the second prepared baking sheet (fig. 3.2). With a moistened finger, smooth down any pointy peaks on the caps. Turn the cocoa powder into a fine-mesh strainer and sift cocoa onto some or all of the caps (fig. 3.3).
-
Place both baking sheets in the oven and bake until the meringues are crisp and dry, about 3 hours. Turn off the oven, prop open the oven door with the handle of a wooden spoon, and let the meringues cool in the oven for several hours, preferably overnight. If not immediately assembling the mushrooms, carefully remove the meringues from the baking sheets, placing them in single layers in large, shallow airtight containers (with a couple of silica packets, if you have them). Double-stack the meringues if necessary, but separate the layers with parchment paper. Store the containers at room temperature until you’re ready to assemble the mushrooms.
-
Line a rimmed baking sheet with parchment paper and set it aside. Fill a small saucepan with about 1 inch of water and bring to a simmer. Turn the chocolate into a small heatproof bowl that fits on top of the pan without touching the water. Place the bowl on the pan and turn off the heat. Let the chocolate melt, stirring occasionally. Set the rig near your work station.
-
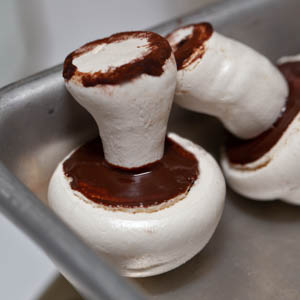
Select the nicest mushrooms caps and stems, matching caps with stems of the appropriate size; you’ll need only 12 to 15 mushrooms for decorating the bûche but assemble as many as you want. If you are browning some or all of the mushroom caps with a culinary torch, set the ones to be torched rounded side up on an unlined baking sheet. Ignite the torch and turn it to low, then brown the caps, holding the flame at a distance of 3 to 4 inches. Using a small, fine pastry brush, paint the underside of some or all of the caps with a fine coat of melted chocolate. Let the caps rest on their heads on the prepared baking sheet until the chocolate hardens, about 20 minutes. Meanwhile, trim the top of each selected stem with a paring knife to make it level. If you like, the base of the stems can be edged with chocolate, dipped in cocoa, and allowed to set.
-
Make the royal icing: Fit a small pastry bag with a tiny plain tip; set aside. In the sparkling-clean bowl of a stand mixer fitted with the whisk attachment, combine the egg whites, lemon juice, and confectioners’ sugar. Beat on medium speed until the mixture is opaque, glossy, thick, and holds stiff peaks, 5 to 7 minutes. Turn the icing into the prepared pastry bag, fold down the top of the bag, and clip it closed.
-
Pipe a drop of icing onto the trimmed end of a stem and affix the stem to its cap. Return the mushroom to the baking sheet, standing it on its head (fig. 8.1), then just keep assembling. Allow the icing to dry, about 15 minutes.
-
Transfer the mushrooms one by one to large, shallow airtight containers; they will keep for a few days at cool room temperature. Reserve the remaining royal icing to “plant” the mushrooms on the bûche platter; it will keep for a few days in the refrigerator.
-
-
2.1
-
2.2
-
-
-
3.1
-
3.2
-
3.3
-
-
-
8.1
-