Double-Chocolate Brownies with Walnuts
introduction
For simple chocolate cake squares eaten with the fingers, brownies are pretty polarizing. There’s the fudgey camp, the cakey camp, those who only like brownies from a box, the deeply irrelevant blondie crowd, and a vocal segment of people who say they don’t like brownies at all. American-born and raised, strife is in a brownie’s DNA.
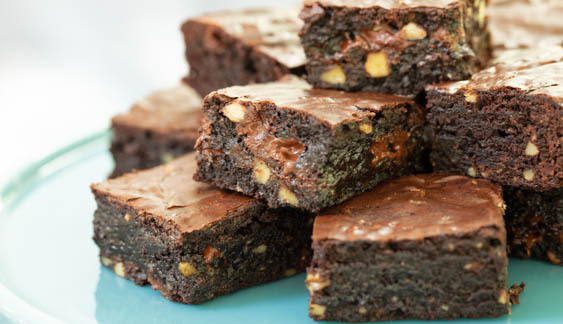
Of course, describing what you don’t want in a brownie is easier than describing what you do. We, for instance, are no fans of brownies that are ponderous with chocolate and butter—they swerve too close to fudge. The far side of that prototype—the school cafeteria, dry cake brownie variants—aren’t fun either. We were looking to produce a brownie relatively light in texture but abundantly chocolatey and complex, moist, and with some chewiness at the edges. We got the light texture by whipping the eggs for volume—not just stirring them into the formula—and the appealing surface sheen a brownie craves by using powdered sugar (the cornstarch in confectioners’ sugar guarantees shine). We got deep chocolate flavor and color using Dutch-processed cocoa for the batter and chopped chocolate stirred in at the end. Simple chopped walnuts. We set the post-bake texture using an Alice Medrich ice bath. Results: a brownie with the chewiest possible corners and dreamy, moist-chocolate centers. No leavening required.
Baking Notes
Valrhona, Droste, and Ghirardelli are all great Dutch-processed cocoa choices—in that order. For chopping and stirring in, we recommend 70 percent Lindt Excellence. The 3.5-ounce eating bars are thin, crisp and easy to mince into little squares.
The brownies are easy to make but gauging when they’re done is a bit tricky. Because the centers do not test clean, you’re essentially baking blind. If you have an oven thermometer, use it—and be sure to set a timer.
equipment mise en place
For this recipe, you will need a digital kitchen scale, a 2-cup liquid measuring cup or a small bowl, a whisk, a small saucepan, an 8-inch square baking pan, parchment paper, a stand mixer with a whisk attachment, a fine-mesh strainer, a silicone spatula, a small offset spatula, a 9 by 13-inch baking dish, and a sharp knife.
-
-
3.5ounces unsalted European-style butter, plus 1 teaspoon for the baking pan
-
2.7ounces Dutch-processed cocoa powder
-
1.5ounces almond oil
-
1½teaspoons vanilla extract
-
4ounces egg without shell (from 2 or 3 large eggs), room temperature
-
8.2ounces confectioners’ sugar
-
3.5
-
½teaspoon fine sea salt
-
1.8ounces bittersweet chocolate (70 percent cocoa solids), preferably Lindt Excellence, chopped into 1/16-inch squares
-
2ounces walnuts, chopped medium-fine
-
-
Adjust an oven rack to the middle position and heat the oven to 325 degrees. Cut two strips of parchment paper to fit into the bottom and up the sides of an 8-inch square baking pan. Coat the pan with the remaining 1 teaspoon butter and line it with the parchment strips, placing them perpendicular to each other.
-
In a 2-cup liquid measuring cup or small bowl, whisk the cocoa powder to break up any large clumps. In a small saucepan, combine the 3.5 ounces butter and almond oil. Set the pan over medium-low heat and allow the butter to fully melt. Pour the hot butter-oil mixture into the cocoa and whisk until smooth and shiny. Whisk in the vanilla, then let cool to room temperature. Meanwhile, turn the flour and salt into a small bowl; set aside.
-
In the bowl of a stand mixer fitted with the whisk attachment, beat the eggs and sugar on medium-high speed until thick and fluffy, about 2½ minutes. Remove the bowl from the mixer. Pour the cocoa mixture into the egg mixture, then sift the flour-salt mixture through a fine-mesh strainer into the mixer bowl. Sprinkle in the chopped chocolate and nuts, then fold with a silicone spatula just until the batter is homogenous; do not overfold.
-
Turn the batter into the prepared pan and smooth with a small offset spatula. Bake until the brownies are well risen and the surface is shiny, about 35 minutes; a tester inserted into the center will come out a little gooey, not dry. When they are nearly done, place a 9 by 13-inch baking dish in the sink and add 3 cups ice and some water.
-
Remove the brownies from the oven and immediately plunge the pan into the ice bath. Allow the brownies to cool in the ice water, rotating the pan after 5 minutes or so, and adding more ice—or pouring off water—if needed. When the bottom of the brownies is cool to the touch, remove the pan from the bath. Lift the brownies out of the pan using the parchment as handles and set the slab on a wire rack and let cool until the surface is no longer warm.
-
Peel off the parchment. Using a sharp knife—and rinsing the blade with hot water and drying it between slices—cut the slab into 16 squares. The brownies will keep in a sealed container for 5 days at room temperature or in the fridge until they’re all eaten.